Overview and quick preview. The start of what should be an entertaining and educational journey. Let’s play with Raspberry Pis, and make them do all kinds of fun things to make our lives better. Let’s make a little network of Raspberry Pis that keep an eye on the home and toss data back and forth at each other. Casually.
This is the part one in a series covering the project I’m working on in my spare time. My hope is to inspire some of you to try something new; maybe even using some of my mistakes to make it easier for yourselves:
- Part 1: Overview and quick preview ← (you are here)
- Part 2: Fun with sensors
- Part 3: Displays
- Part 4: Casual networking
- Part 5: Bonus features
- Part 6: Physical constraints
Why are you doing this?
I want to know what’s happening in other parts of my home without walking around the whole place to check. Last year we built a beautiful detached sunroom in our backyard. Mosquitoes make sitting outside in the summer difficult without some kind of physical barrier. Even though the room has windows on a sunny summer afternoon it can get too hot to use. Conversely, a cloudy autumn evening is too cold. We never know if it’s a good time to head to the sunroom without checking the room ourselves, and we’d like to use it as much as possible.
There are plenty of other applications I’d like to explore: garage doors, doorbells, indoor conditions, remote monitoring, learning, teaching.
What is the “casual smart home”?
You can call it lazy, if you want, but when I build technology for my home, there are some principles I try to stick to:
- Easy to update. Don’t worry about firmware updates or plugging in to reconfigure and put new code on my devices.
- Roll with the punches. Don’t fail, crash, and lock up until a manual restart. Figure out a way to keep functioning, and report the error.
- Dynamic configuration. Figure out as much about the environment as possible without manual entry. If a new device appears, add it. If an old device disappears, remove it.
- No apps required. Information at a glance. Don’t make me use a app to find something out.
The priorities
MUST
- Stick to casual smart home principles.
- Show current conditions.
- Keep data on the LAN. Security matters.
- Be (very) affordable to build and expand.
SHOULD/MAY
- Allow reporting over the internet.
- Show historical conditions.
- Have nice graphics.
- Allow checking conditions at a distance.
- Produce sounds as appropriate.
Materials used
I was originally planning to use a bunch of ESP8266 boards, but then the Raspberry Pi Zero W went on sale for $10, and my local Micro Center has plenty in stock.
- Raspberry Pi Zero W $10
- Way too many 1.25mm 4-pin connectors ($6 for 50)
- AM2322 temperature/humidity sensors ($3)
- 4GB MicroSD cards ($4-8)
- 128x64 I2C OLED displays (Adafruit, Aliexpress) ($3-20)
Optional, but recommended:
- Headers to solder onto the Pi, ideally double-row right-angle connectors
- DIY Dupont connector kit
- Appropriate power supplies (I got some 5V@15A, you’ll see why later) and connectors ($5-$20)
Overview
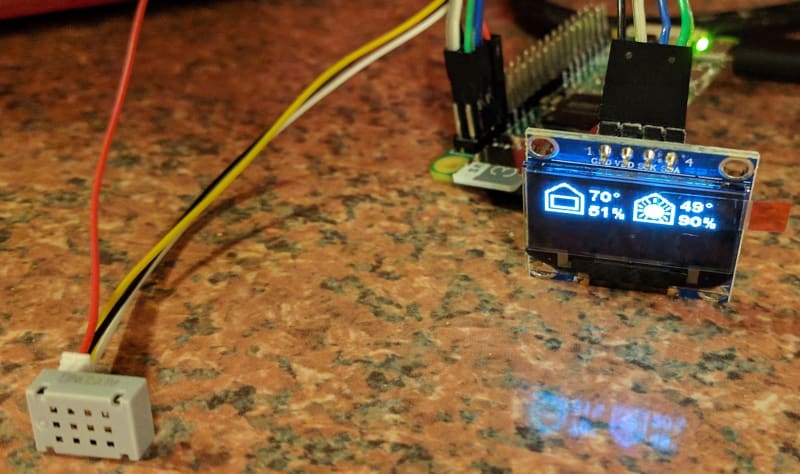
The hardware is pretty boring for now, but it gets the job done. We use the Inter-Integrated Circuit (I2C) protocol, since with just two wires (data and clock) we can send and receive data from our temperature sensor and our display. It’s pretty fast, easy to understand, and compatible across different voltages (3.3V, 5V) without conversion. The sensor uses a tight spacing for the pins (1.25mm), so those 4-pin connectors come in handy. The sensor is powered from output pin 7 on the Pi - which we’ll discuss in a future blog post.
The display is beautifully bright OLED screen. We’ll cover it in more details in a future blog post, as well.
The software is much more interesting. It’s pretty much all python.
- The Pi periodically reads the temperature and humidity.
- Every minute it updates the OLED display with the latest information for itself and up to 3 other Pis.
- The Pi joins a multicast UDP address.
- It broadcasts a small packet which includes its name, conditions, timestamp, and 32x32 icon. Images and graphics will be covered in a future blog post.
- It receives multicasts from other Pis and updates its list of known devices.
- If it hasn’t heard from another Pi in an hour, the Pi automatically removes it from the list.
More casual
With casual principles, I don’t want to deal with updates, individual configs, SSH keys, and manual restarts. I read a blog post describing a project that used resin.io, and I am very happy with how much easier it made the process. Because of resin.io, I can:
git pushmy python code updates to all of my devices at once.- Check the health status of each Pi individually.
- Reconfigure environment variables through the web, and have the app restart automatically.
- SSH into any device using the website or a shared SSH key.
I can’t afford their paid service, so for the time being I’ll have to stay under 5 devices; that’s okay for now.
What’s next
You can keep an eye on my code work on github. There are some pieces around the AM2322 sensor that I’ll probably release separately so other can use it easily. I need to look into OpenHab and AdafruitIO, which I have provisional support for right now.
There’s a lot more to talk about what’s already done, and then we can get to other fun things: sounds, sensors, lights, cases. Stay tuned!

-vkm
Who’s Varun?
I most recently was the founder of an HR tech startup, Disqovery. I have worn many hats, and I like making things. I also like talking business. You can reach me at me@varunmehta.com, Mastodon, Github, and LinkedIn.


